Physical Address
304 North Cardinal St.
Dorchester Center, MA 02124
Physical Address
304 North Cardinal St.
Dorchester Center, MA 02124

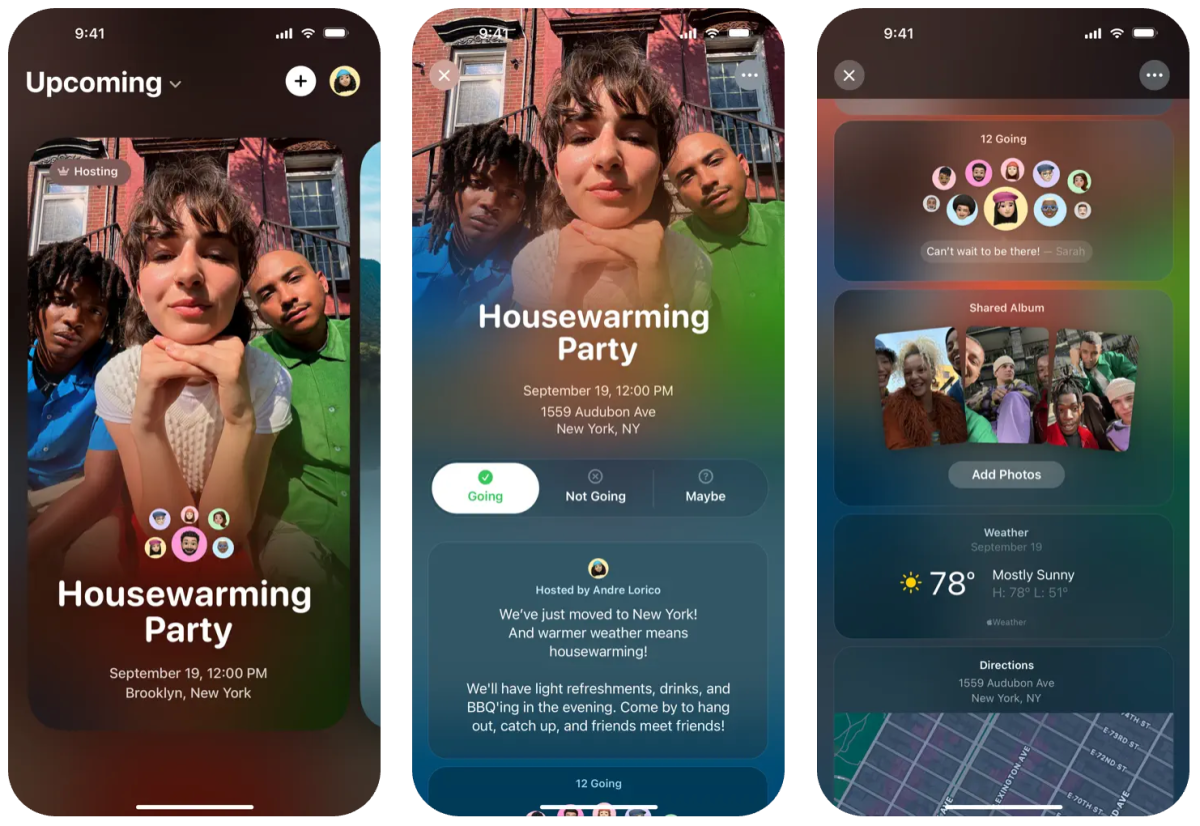
Apple has released a new application called Invites designed to facilitate the creation of allocated invitations using iPhone or on the web. The invitations is the Apple version of partialA common invitation app has been directed by the Google Play Award for 2024.
It allows you to create and exchange invitations, RSVP for events, contribute to joint albums, and the soundtrack of the event.
To create an invitation, you need to subscribe to iCloud+, which costs 99 cents per month. However, anyone can RSVP, regardless of whether he has an Apple account or Apple.
In this post, we will continue with you during the process of creating an event, add a joint album or a run -off, and send your invitation to the guests.
You can create an event in Apple calling for the use of the application on your iPhone or the web on iCloud.com. Whatever the way you choose, the process is the same.
If you are in the app, you need to click Plus in the upper right corner to create an event. If you are on the web, you need to determine a “new event” in the right upper corner.
From here, click “Add the Background” option, then choose “Pictures” to determine a picture from your library. Or click the “camera” option to take a new image of the background. Apple also offers a selection of backgrounds to choose from.
Instead, you can use the Apple Photo Stadium to produce original background images. To use the photo stadium integration in invitations, you will need an iPhone compatible with Apple Intelligence, which means you need iPhone 15 Pro.
Once add a background, click “Event Title” to enter your event name and then choose line style.
Then, click on “History and Time” to choose the day and the time when the event begins and ends. You can also choose to appoint him as an event throughout the day. After setting an appointment, the weather forecast for this date will be added to the invitation.
Next, click the “site” to find a site or click on a proposed site. You have the option to enter a site name, such as “Emily’s House”. When you set a site, you will add invitations to add Apple maps automatically to the invitation.
Finally, you can insert a description of the event, using the Apple Intelligence writing tools to help you write the description, if you want it. Again, your device will need to be compatible with Apple Intelligence for the use of the feature.
Once you create your event, you can click on a “preview” option to find out what it looks before sending it to your guests.

While the above steps cover the basics of creating an invitation to an event, Apple offers two other features that can transfer your invitations to the next level.
You can create a “joint album” where those present can contribute pictures and videos from inside an invitation. The idea behind this feature is to give those present as a way to save their memories and restore the event at a later time.
To do this, you need to click on the “Create the album” option. The name of the joint album will be the name of the event, but you can change it if you want it.
You can also create a photocopy of the event by selecting the “Add Running menu” option. The attendees can then choose to add songs to the operating menu before or during the event. It should be noted that you need to subscribe to Apple Music to create a joint operating menu. As with shared albums, your operating menu will have the name of your event, but you can edit it.

There are two ways to invite guests to your event. You can either share the invitation as a general link or send it to specific people from your contact list.
You need to determine the “guests’ invitation” to start sending invitations. If you select “messages” or “mail” applications, you can send a general link directly through these applications. If you select “sharing”, you can send the invitation to the guests through any application in your iOS sharing paper. If you click “Copy Link”, you can paste the link to invite you anywhere.
To invite a contact, click “Choose a guest” option, search for a name, or choose a person from your contact list, then share the link with them.
After you create an invited event and a guest, you can share a note that everyone can see in the list of guests. For example, you can allow guests to know if you have changed the event site, or you can send them a reminder to bring umbrellas if the expectations are calling for rain.
To do this, select your event and then click “Send Note”. Once you write your note, click the “Send the Note” button.